With text panels, you can insert commentary into any page where a chart would normally appear. A text panel replaces a chart with space to add your own observations, comments, and advice, as well as including values pulled from the data to save time and ensure the accuracy of your reporting. The text panel uses the same functionality as the Executive Summary, so if you're familiar with this you already know how to work within the text panels.

Add a text panel

You can add a text panel into any page which has space for a chart. This includes the chart gallery pages, profit and loss, and balance sheet pages.

Tip:  if your text panel is the only panel on the row, the text will automatically expand to the full width of the page when you output your report.

  1. Open the Customise Layout tab, and click to customise the page where you want to place your text.
  2. If you're replacing a chart with a text panel, click Replace. If you're adding a new text panel, click Add Chart.

    This opens the Change Chart window.
  3. From the left-hand side, click Create a text panel.

  1. From the centre pane, select Text Panel.
  2. To add your text panel, click Select.


A preview of the page you're working in appears, with your text panel on the right-hand side. You can now work in the text panel as needed.

Enter text directly

If you want to enter your own text based on information that isn't in Spotlight, you can enter this directly into the text panel. You can use the font size, bold, underline, and list options at the top of the panel to format your text. At any time, you can click the Update button at the bottom right-hand corner of the window to update the preview and view your changes.

Include tags and auto text

Tags

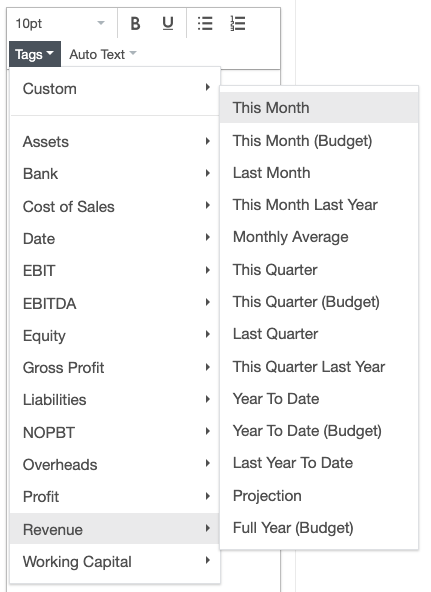
Tags represent individual pieces of data from within Spotlight. For example, you may want to insert a tag to include the date of the report, or the current months revenue. There are many pre-set tags available, and you can also create your own custom tags if needed.

To use a tag in your text panel, first of all enter any text that you want to go before the tag. Next, from the Tags drop-down list, select the tag that you want to use.

Auto Text

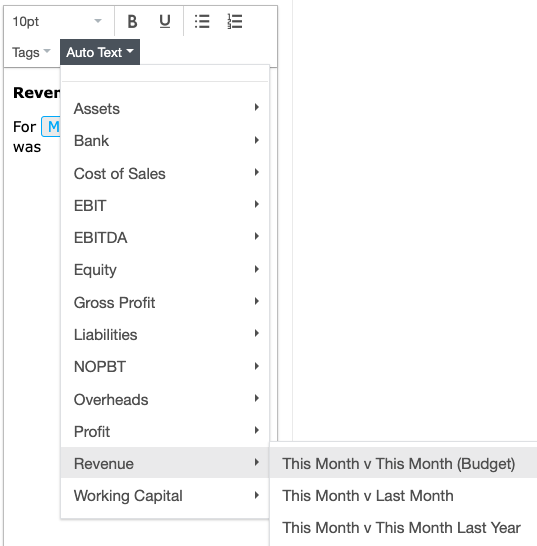
Auto text is a pre-set paragraph which uses a combination of text and tags to create a comparison between two values. For example, you can add auto text to include a comparison between the revenue to date and the original budgeted revenue, including a variance.

To include auto text, open the Auto Text drop-down list, then select the auto text comparison that you want. Once you've inserted the auto text, if you want to you can edit the text parts of this paragraph as needed.

Include custom tags

To set up a custom tag

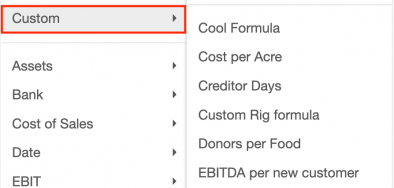
You can set up the custom tag from within the Formula Gallery for the organisation.

  1. From the main Spotlight screen, click the Settings link under the organisation name, then click the Formula Gallery tab.

    Alternatively, if you're working in the Executive Summary, within the section you're working in click the Tags option, then hover the mouse over the Custom option, and click Create Custom Tag. You'll then be prompted to go to the Formula Gallery to set up the new tag.

    Note: You can also access the Formula Gallery from the practice settings at the top right-hand corner of the main Spotlight screen. However, if you access it in this way, please note that you will not be able to create organisation level formulae using individual account names, as these are held at organisation level.

  2. To set up a new formula from scratch, click Create New Formula.

    Alternatively, if you want to amend an existing formula, you can click the Copy and Edit button alongside a default formula, or click the Edit button alongside a formula you've previously created.
  1. Next, use the Formula Builder to set up the formula you need. This formula can use imported accounts or accounts you've set up manually within the non-financial section.
  2. Once you've finished creating your formula, click Save As.
  3. From the Available to drop-down list, choose either Organisation or Practice. If you choose Organisation, your formula will be available only within this organisation. If you choose Practice, the formula will be available to all organisations.
  4. Enter a name for the formula.
  5. If required, enter any formula tags. You can use these to search for the formula later.
  6. To save the formula, click Save.

To apply a custom tag in your text panel

  1. In the Customise Layout tab, click to Customise the page containing your text panel, then click to customise the text panel.
  2. Click into the space where you want to place the custom tag, then click the Tags drop-down list.
  3. Click Custom, then select the tag you want to insert.

Insert Custom2


The name of the tag appears in the data entry box, and when you update the page, the result of your formula appears. This will automatically update in future, based on the report date.

Still need help?